 New Fan Works
 Old Fan Works
 Zelda Series
 Multimedia
 Features
 Interactive
 Site Info
|
Zelda II Bestiary
All the enemies in Zelda II
This section contains a detailed list of all the
enemies you will encounter in Zelda II. It includes pictures and descriptions of
each monster. They are divided into categories of where you'll find them, such
as Overworld mosnters, level monsters, and bosses.
Overworld Monsters |

|
This is Bit. Basically, it's a little
blob that slides on the ground. Not much of an enemy.
Point value: 2 |

|
This is Bit's cousin, Bot. It's pretty
much the same thing as Bit, only this one can jump. Don't think they're tame, though.
They have the nasty habit of jumping on top of you just as you're jumping over a pit,
causing you to plunge to your death. Inthe Great Palace, these guys take more
hits to kill and are worth more points.
Point value: 2 in overworld, 10 in Great Palace |

|
This happy little guy is a Lowder. It's
a little beetle that crawls on the ground.
Point value: 3 |


|
These are Aches, they are little bats
that perch on the ceilings of caves. When you approach them, they swoop
down at you. The red one has an added bonus in that it turns into some
kind of hideous gargoyle that'll shoot fireballs at you. It looks
tougher than it really is.
Blue Ache point value: 3
Red Ache point value: 10
|


|
These are Deelers. They're spiders that
hang from trees in forest areas. When you walk underneath one, it will
dangle down on a string and try to hit you. The red ones stay on their
string, and the blue ones come off their string and jump around on the
ground.
Red Deeler point value: 2 in West Hyrule, 5 in East Hyrule
Blue Deeler point value: 3 in West Hyrule, 10 in East Hyrule
|

|
These are Megamats, but I like to
call it a bouncy thing. It's some kind of bug that hops up and down. They
can get really annoying.
Point value: 5 |

|
This is some kind of fly called a Boon. It flies maniacally
through the air and drops stones on you. The upthrust is good for defeating
it.
Point value: 50 |

|
This is a Geldarm. It lives in desert
areas. You'll see them sticking out of the ground. To defeat it, strike
it anywhere with your sword and it will sink down into the ground, leaving
its head exposed. To kill it you have to strike it in the head.
Point value: 5 |


|
These are Goriyas. They're all pretty
much the same. They throw boomerangs at you, which can be blocked by your
shield.
Orange Goriya point value: 20
Red Goriya point value: 20
Blue Goriya point value: 30 |


|
These are Moblins. You'll find them in a lot of places. Red
and orange ones strike you with spears, and the blue ones throw spears.
Orange Moblin point value: 10
Red Moblin point value: 20
Blue Moblin point value: 20 |


|
These are Moas. They are flying things
that hover in the air. The orange one is found in most castles, and they
drop fireballs on you. The other ones are usually found in graveyards.
Be cautious around these things, they fly unpredictably and take away points
when they hit you. Also, if you don't have the cross some of them are invisible.
Orange Moa point value: 50 (-10 points when you get hit)
Red
Moa point value: 10 (-20 point when you get hit)
Blue Moa point value: 50
(-20 points when hit)
Pruple Moa point value: 30
|

|
This is a scorpion that goes by several names, such as Aru
Lowder, Aruroda, and Skettlar. It shoots fireballs
at you, which can be blocked if you use the Reflect spell. You can only
hurt it when its eye is open.
Point value: 150 |

|
This is a Myu. They're annoying little spiky things that
slither on the ground. You can only defeat it with the downthrust.
Point value: 3, 10 in the Great Palace |


|
These are Octorocks, they both spit rocks
at you. The red ones usually stay in place and jump up and down, and the blue ones can walk across the
ground.
Red Octorock point value: 10
Blue Octorock point value: 20 |

|
This is a Moby, and annoying little bird
that swoops down and tries to divebomb you. They take away experience points
when they hit you.
Point value: 2 (-10 when you get hit) |

|
This is a Leever. It lives in desert areas
and they pop up out of the sand.
Point value: 10 |


|
These are Dairas, somtimes called Diggers. The orange one tries
to club you with an axe, and the red one actually throws axes at you. The
axes can be blocked with the Reflect spell.
Orange Daira point value: 70
Red Daira point value: 100
|


|
These are often called Lizaflos or Lizardmen, and
I call them lizard knights. They behave a lot like the Iron Knuckles you'll
find in the castles. The orange one uses a spear, the red one clubs you,
and the blue one throws clubs. The spear can be blocked with your shield,
but the clubs can only be blocked if you're using the Reflect spell. These are
also unusual in that the red version is actually worth fewer points than the
orange version.
Orange Lizaflos point value: 150
Red Lizaflos point value:
100
Blue Lizaflos point value: 200 |

|
This is a Tektite. They hop around and
occasionally shoot some kind of flashing particle at you. These can only
be defeated with the Fire spell, and their attack can be blocked with a
shield. Point value: 50 |


|
These are usually called Basilisks or River Zoras in some
contexts, but
I call it a dinosaur. They pretty much stay in one place and alternate
between a sitting and standing position. Like the Tektites, they shoot
beams at you and can only be defeated with the Fire spell.
Point value: 50 |
Underworld Monsters |

|
These are usually called Tinsuits. Its
a simple little enemy that wanders through the castle. Try to avoid them
because they take away points when they hit you.
Point value: 0 (-10 when you get hit) |


|
This guy is a Stalfos. They come in red
and blue varieties. The red ones stay on the ground and the blue ones can
jump.
Red Stalfos point value: 30
Blue Stalfos point value: 50 |


|
These are the dreaded Iron Kunckles. The
red and orange ones will attack you with their swords. They will randomly
stab you from the top or the bottom, so pay close attention to them. They
also move their shields up and down to make it harder to attack. The blue
one is bad news. They also shoot swords at you, which make them probably
the most annoying enemy you'll ever find.
Orange Iron Knuckle point value: 50
Red Iron Knuckle point
value: 100
Blue Iron Knuckle point value: 150 |


|
These are Bubbles, the annoying floating
skulls. They can be defeated, but they take an insane amount of hits. They
are very annoying because when they hit you, they take away life and magic.
The big skull splits into two little ones, and it's only found in Level
7.
Point value: 50, 20 in the Great Palace |


|
This is the annoying flying head. I always called them
Unicorn heads, but the seem to actually be called dragon head or Ra. They
fly in a sine wave pattern through some rooms in the castle.
These guys take away points when they hit you. They also come in yellow
in Level 7.
Point value: 20 (-10 points when you get hit)
|

|
This is the even more annoying head that looks like a wolf.
It's often called Wolf Head or Mau. They
fly in a straight line, and stop and move up and down in a square wave pattern.
They shoot beams at you and can get very annoying when they start to pile
up. They take away points when they hit you.
Point value: 5 (-10 when you get hit) |

|
This guy goes by several names, such as Doomraddle, Mace
Thrower, or Guma. It throws hammers at you. It's not
that hard, but it can be annoying at times. The best strategy is to wait for it
to jump and create a gap in his arc of hammers. Then you can move in for the
kill. This thing always reminded me of Gossamer from Looney Toons (that giant
hairy red monster).
Point value: 50 |

|
This dude throws clubs at you. It is sometimes called
Doomknocker, Watch out
for those clubs because they fly a little bit then reverse direction and
come flying back at you, kind of like a boomerang. These guys also jump
up in the air. The clubs can be blocked with the Reflect spell.
Point value: 100 |


|
These guys are just like the Stalfos. They are often called
Armored Stalfos, or Stalfos Knights. I call them cat knights because their
hemlets look like they have cate ears. Unlike normal Stalfos, they can both
jump, and can use the downthrust to attack you.
Red Armored Stalfos point value: 50
Blue Armored Stalfos
point value: 70 |

|
This is often called a Sorcerer or Fire Dropper. It is some kind of wizard that appears and disappears at random
to slide a fireball on the ground towards you. If you need experience points,
these guys are perfect. They only take a few hits, but you have to have
patience for them to appear in the right spot so you can hit them. Only
found in Level 5.
Point value: 200 |


|
These are little snakes called Ropes. The blue ones
shoot stones at you, and the red ones shoot fireballs. The red ones are
only found in Level 7. The fireballs can be blocked with the Reflect spell.
Point value: 20 |

|
This is a Wizzrobe. They appear and disappear
at random to shoot little spells at you. The only way to defeat it is to
use your Reflect spell to reflect the spells back at them.
Point value: 100 |

|
This is some kind of evil bird, sometimes called Fotail or
Fokkeru. It hops
around and shoots fireballs. Watch out for the fireballs because they do
a lot of damage. These are only found in Level 7.
Point value: 200 |


|
These are often called Bird Knights, or Fokka. These are like blue Iron knuckles only worse. These
guys shoot swords and they jump. The red one jumps in a nice sane pattern,
while the blue one just jumps around like crazy. A good strategy for defeating
them is to use your upthrust when they jump above you.
These are only found in Level 7.
Red point value: 70
Blue point value: 100 |

|
This is a giant bot. It falls from the
ceiling in some rooms in Level 7. When you strike it, it will split into
a whole bunch of little bots. |
Dungeon Bosses |

|
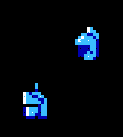
This is the boss of Level 1 (Parapa Palace) and is called
Horsehead. It's a guy with a horse head. Fitting name. The best way to defeat
this guy is to stand at the far left of the screen and jump up to his his head
before he strikes. A strange glitch in the game will allow you to strike him
before he gets into striking distance of you. This only works if you're at the
far left.
Point value: 50
|


|
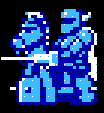
This is the boss of Level 2 (Midoro Swamp Palace) and is called
Helmethead. Like the previous Horsehead, you need to strike him in the head.
After a few hits, his first helmet pops off and is replaced by a new helmet.
Then you hit him again and his second helmet flies off and his bare, white head
pops up. Then you stike his bare head some more to kill him. Unfortunately, his
disembodied helmet heads float around and shoot little energy particles at you.
Point value: 200
|

|
This is the boss of Level 3 (Island Palace) and is often called
Ironknuckle or Rebonack. It is basically a normal blue Iron Knuckle that rides a
mechanical horse. He has two main phases of attack. In the first phase he floats
back and forth on his horse. You have to jump over him and use the downthrust to
strike the knight on the head (hitting the horse's head won't work). After a few
hits, he jumps off his horse and turns into a normal blue Iron Knuckle. Use your
standard strategy to deafeat him. The only annoyance is that the Iron Knucle has
the tendency to walk off the screen where you can't hurt him, but he can still
hurt you. You have to move backwards to get him to move back onto the screen.
This boss is also the only boss to be used as a miniboss in another level (Level
6).
Point value: 300
|

|
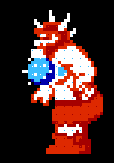
This is the boss of Level 4 (Maze Island Palace) and is often called
Carrock. He is basically a giant Wizzrobe. And like the wizzrobes, he can only
be harmed by bouncing his attacks back at him using your Reflect spell. I think
he's the easiest boss to defeat. First, enable your Reflect spell. Then move all
the way to the right edge of the screen. Then crouch down and face left. Don't
move. Carrock will appear at random and shoot spells. Eventually he'll be
defeated. It's much better if you stay on one edge of the screen and face the
same direction without moving. He'll be dead in no time.
Point value: 300
|
|
This is the boss of Level 5 (Sea Palace) and his name is
Gooma. This guy is a little tougher than he looks. His attack is swinging a mace
at you, and that mace does considerable damage. The downthrust is useless, and
you can't damage his head. You have to strike his body. The best strategy is to
time his mace swings and move in, stab him, and move back out. The jump spell
can help you to dodge his attacks. In a more curious note, this boss was
invented for the later worldwide release of Zelda II. He didn't exist in the
Japanese version, so you end up fighting Helmethead again in that version.
Point value: 500
|
|
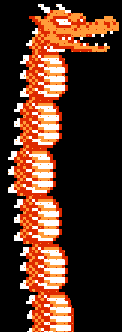
This is the boss of Level 6 (Three-Eye Rock Palace) and is
called Barba. He looks more difficult than he really is. The guy's attack is to
rise out of a lava pit, shoot fireballs at you, and sink back down. I usually
use the Jump spell to enable me to strike him and dodge his attacks. When he
rises to his maximum height he'll shoot a stream of fireballs at you. Jump to
dodge these and then jump up to strike his head. Alternately, you can wait until
he almost sinks back into the lava and strike his head then. Just make sure not
to get hit by the fireballs, because those can send you flailing backwards into
the lava pits.
Point value: 700
|
|
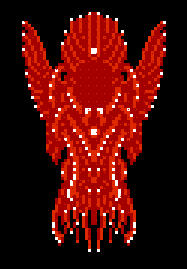
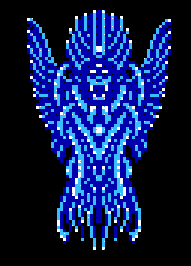
You've finally made it to the Great Palace. This guy here
is Thunderbird, the first of two final bosses of the Great Palace. Before you
get to this boss, make sure your life and magic meters are full if at all
possible. Now you have to decide which magic spells to use to maximize your life
expectancy. You must use the Thunder spell to beat the boss. With your remaining
magic, you can use either Life or Shield, but not both.
Here's a breakdown of the damage you can take in each scenario,
which I tested myself:
Using Life: Each hit from a fireball takes away 2.5 hearts.
Since you have eight hearts, three hits will leave you with half a heart, and
the last hit kills you. If you use the Life spell, you get three extra hearts.
But the amount of damage you take is still 2.5 hearts, so when you add it up,
you only get one extra hit. So using the Life spell, you only get five hits
before you die.
Using Shield: When you use the Shield spell, fireballs take
away 1.25 hearts. The first six hits take away 7.5 hearts, leaving you with half
a heart. The last hit kills you. This means that you can take seven hits before
you die.
So the logical choice is to use your Shield spell. This also
leaves you with enough magic for the Jump or Reflect spell. I recommend using
the Reflect spell because in rare cases, if the fireball is at just the right
angle, it will block them. But it isn't a guarantee. It just gives you slightly
more protection.
Now how to beat him. Thunderbird starts out red. You
can't harm him when he's red. You must use the Thunder spell, which will turn
him blue and expose his face. Then you have to strike him in the face to hurt
him. The main strategy is to avoid the fireballs because they do significant
damage. The key is patience. Dodge the fireballs, and when you get an opening,
strike him. Keep an eye on the fireballs, not the enemy himself. Only the
fireballs can hurt you. If you keep calm and dodge effectively, you can beat
this monster.
Point value: 1000
|
|
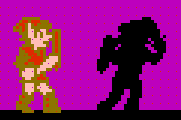
This the final boss of the game. You must fight yourself,
or at least a shadow of yourself. He's often called Dark Link, or Link's Shadow.
If you try to fight him like a normal enemy, the battle will be long, tedious,
and potentially fatal. But there's a glitch in the game that makes this boss the
easiest of them all. First of all, use your Shield spell. Then go to the very
left of the screen and crouch down. Then keep striking your sword, even if he
isn't there. Dark Link will randomly jump at you and he will miraculously get
hurt, with no more effort from you than button-mashing. Just keep hitting that
button, don't move, and Dark Link will defeat himself.
No point value
|
|
 Sections
 Walkthrough
|


